ASUS ROG STRIX X99 Gaming Motherboard Review
Introduction
- Manufacturer: ASUS
- Product Page: Strix x99 Gaming
- Purchase: £279.99 Ath the time of review
Today, we will be taking a look at the ASUS STRIX X99 Gaming motherboard. While X299 is right under our feet, the X99 platform is still a very viable option for those who need bit more performance from their system. Those who edit photos or videos are amoung some who may want a bit of extra performance from their CPU. Having a higher core/thread count is great for multi-threaded applications and can also allow you to do other things on your PC while you’re rendering such as search the web or even write articles like I am doing now with a video rendering in the background. With X99, not only do you get added CPU performance but you can also utilise up to 8 sticks of DDR4 RAM which can give you a lot of extra performance as well.
The STRIX X99 Gaming is jam packed full of features and even includes AURA RGB compatibility. It can support up to 128Gb of DDR4 RAM running at 3300MHz(OC) in a quad channel configuration. For storage, there are single M.2 and U.2 slots which can support a number of different PCIe based solutions including NVMe devices as well as 8 standard SATA 6Gb/s ports. There are loads of more features as well, such as 3x PCIe 3.0 slots for multi-GPU configurations, Wi-Fi 802.11 a/b/g/n/ac and BlueTooth v4.1 and a load of other ports and connections we will take a closer look at in the review. There is no denying that this board is definitely a beast on paper, but are all the functions and features needed and do they help make this board superior? Well, let’s take a look and find out!
Specifications
- CPU
Intel® Socket 2011-v3 Core™ i7 X-Series Processors
Supports Intel® 14 nm CPU
Supports Intel® Turbo Boost Max Technology 3.0
* Refer to www.asus.com for CPU support list - Chipset
Intel® X99
- Memory
8 x DIMM, Max. 128GB, DDR4 3333(O.C.)/3300(O.C.)/3000(O.C.)/2800(O.C.)/2666(O.C.)/2400(O.C.)/2133 MHz Non-ECC, Un-buffered Memory
Quad Channel Memory Architecture
Supports Intel® Extreme Memory Profile (XMP)
* Hyper DIMM support is subject to the physical characteristics of individual CPUs.
* Refer to www.asus.com for the Memory QVL (Qualified Vendors Lists). - Multi-GPU Support
Supports NVIDIA® 3-Way SLI™ Technology
Supports NVIDIA® 2-Way SLI™ Technology
Supports AMD 3-Way CrossFireX™ Technology
Supports AMD 2-Way CrossFireX Technology - Expansion Slots
3 x PCIe 3.0/2.0 x16 ( x16, x16/x16, x8/x16/x8 mode with 40-LANE CPU; x16, x16/x8, x8/x8/x8 mode with 28-LANE CPU)
1 x PCIe 2.0 x16 (x4 mode)
2 x PCIe 2.0 x1 *1 - Storage
New Intel® Core™ i7 X-Series Processors :
1 x M.2 Socket 3, with M Key, type 2242/2260/2280/22110 storage devices support (Support PCIE SSD only)
1 x U.2 port, support PCIe 3.0 x4 NVM Express storage
Intel® X99 chipset :
1 x SATA Express port, Compatible with 2 x SATA 6.0 Gb/s ports
8 x SATA 6Gb/s port(s),
Supports Intel® Smart Response Technology, Intel® Rapid Recovery Technology*2 - LAN
Intel® I218V, 1 x Gigabit LAN Controller(s)
- Wireless Data Network
Wi-Fi 802.11 a/b/g/n/ac
Supports dual band frequency 2.4/5 GHz
Supports MU-MIMO - Bluetooth
Bluetooth V4.1
- Audio
ROG SupremeFX 8-Channel High Definition Audio CODEC
– Supports : Jack-detection, Multi-streaming, Front Panel Jack-retasking
Audio Feature :
– SupremeFX Shielding™ Technology
– Optical S/PDIF out port(s) at back panel
– Audio amplifier: Provides the highest-quality sound for headphone and speakers
– Premium Japanese-made audio capacitors: Provide warm, natural and immersive sound with exceptional clarity and fidelity
– Sonic Radar II - USB Ports
Intel® X99 chipset :
5 x USB 3.1 Gen 1 port(s) (1 at back panel, blue, 4 at mid-board)
Intel® X99 chipset :
8 x USB 2.0 port(s) (4 at back panel, , 4 at mid-board)
ASMedia® USB 3.0 controller :
3 x USB port(s) (3 at back panel, blue)
ASMedia® USB 3.1 controller :
2 x USB 3.1 Gen 2 port(s) (2 at back panel, , Type-A + USB Type-CTM) - Overclocking Features
ROG RAMCache
Overwolf
GameFirst IV
USB BIOS Flashback - Special Features
5-Way Optimization by Dual Intelligent Processors 5
– 5-Way Optimization tuning key perfectly consolidates TPU, EPU, DIGI+ VRM, Fan Xpert 4, and Turbo Core App
Gamer’s Guardian:
– ESD Guards on LAN, Audio, KBMS and USB3.1/3.0/2.0 ports
– DRAM Overcurrent Protection
– Stainless Steel Back I/O
– Highly Durable Components
– DIGI+ VRM
ASUS Exclusive Features :
– USB BIOS Flashback
– MemOK!
– AI Suite 3
– Ai Charger+
– ESD Guards
– USB 3.0 Boost
– USB 3.1 Boost
– Disk Unlocker
– Mobo Connect
– PC Cleaner
ASUS Quiet Thermal Solution :
– ASUS Fan Xpert 4
ASUS EZ DIY :
– ASUS CrashFree BIOS 3
– ASUS EZ Flash 3
– Push Notice
ASUS Q-Design :
– ASUS Q-Shield
– ASUS Q-Code
– ASUS Q-LED (CPU, DRAM, VGA, Boot Device LED)
– ASUS Q-Slot
– ASUS Q-DIMM
– ASUS Q-Connector
RAMCache
AURA: RGB Lighting Control - Operating System Support
Windows® 10 , 64bit
Windows® 8.1 , 32bit/64bit
Windows® 7 , 32bit/64bit - Back I/O Ports
1 x PS/2 keyboard/mouse combo port(s)
1 x LAN (RJ45) port(s)
1 x USB 3.1 Gen 2 (red)Type-A
1 x USB 3.1 Gen 2 (black)USB Type-CTM
4 x USB 3.1 Gen 1 (blue)
4 x USB 2.0 (one port can be switched to USB BIOS Flashback)
5 x Audio jack(s)
1 x USB BIOS Flashback Button(s)
1 x ASUS Wi-Fi GO! module (Wi-Fi 802.11 a/b/g/n/ac and Bluetooth v4.0 - Internal I/O
1 x U.2 port
1 x AAFP connector
1 x Aura RGB Strip Header
2 x USB 3.1 Gen 1 connector(s) support(s) additional 4 USB 3.1 Gen 1 port(s)
2 x USB 2.0 connector(s) support(s) additional 4 USB 2.0 port(s)
1 x SATA Express connector: , Compatible with 2 x SATA 6.0 Gb/s ports
1 x M.2 Socket 3 with M Key design, type 2242/2260/2280/22110 storage devices support (Support PCIE SSD only)
8 x SATA 6Gb/s connector(s)
1 x CPU Fan connector(s)
1 x CPU OPT Fan connector(s)
2 x Chassis Fan connector(s)
1 x Thunderbolt header(s)
1 x 24-pin EATX Power connector(s)
1 x 8-pin ATX 12V Power connector(s)
1 x 4-pin ATX 12V Power connector(s)
1 x EZ XMP switch
1 x 5-pin EXT_FAN(Extension Fan) connector
1 x DRCT header(s)
1 x MemOK! button(s)
1 x Thermal sensor connector(s)
1 x CPU OV
1 x Power-on button(s)
1 x Reset button(s)
1 x Clear CMOS jumper(s)
1 x Water Pump header (4-pin)
1 x ROG extension (ROG_EXT) header(s)
1 x 14-1 pin TPM connector
1 x COM port header
1 x High AMP Fan header (4-pin) - Accessories
User’s manual
I/O Shield
4 x SATA 6Gb/s cable(s)
1 x M.2 Screw Package
1 x CPU installation tool
1 x Supporting DVD
1 x ASUS 2T2R dual band Wi-Fi moving antennas (Wi-Fi 802.11a/b/g/n/ac compliant)
1 x Cable ties pack(s)
ROG Fan Label
1 x Extension Cable for RGB strips (80 cm) - BIOS
128 Mb Flash ROM, UEFI AMI BIOS, PnP, WfM2.0, SM BIOS 3.0, ACPI 5.0, Multi-language BIOS,
ASUS EZ Flash 3, CrashFree BIOS 3, F11 EZ Tuning Wizard, F6 Qfan Control, F3 My Favorites, Quick Note, Last Modified log, F12 PrintScreen, and ASUS DRAM SPD (Serial Presence Detect) memory information. - Manageability
WfM 2.0, WOL by PME, PXE
- Form Factor
ATX Form Factor
12 inch x 9.6 inch ( 30.5 cm x 24.4 cm ) - Note
*1 The PCIEX4_1, PCIEX1_2, and USB3.1_EC1EA2 connectors share the same bandwidth. By default, the PCIEX4_1 slot and PCIEX1_2 slot automatically run at x1 mode with USB3.1_EC1 and USB3.1_EA2 enabled for best resource optimization.
*2 These functions will work depending on the CPU installed.
Packaging
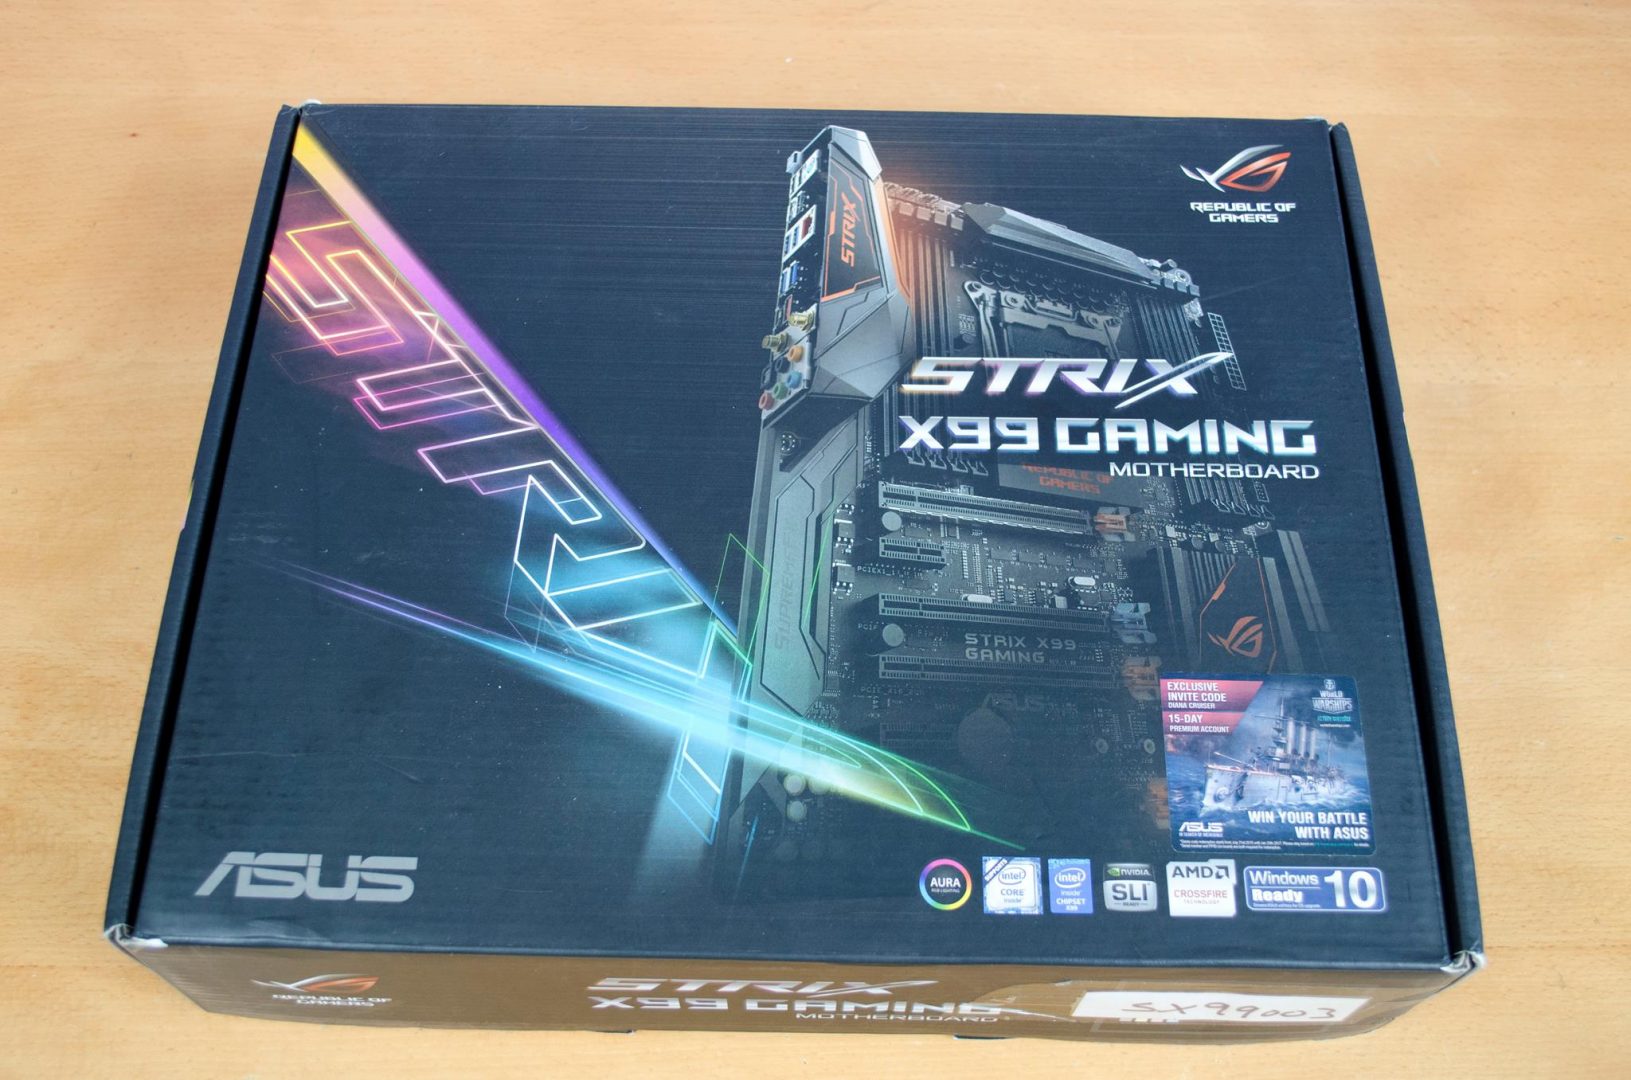
Taking a quick look at packaging before we get started and on the front, we have an image of the motherboard itself, though it is not 100% viewable. There is also big STRIX writing as we would expect from ASUS on such a product in a nice bright and bold fashion.
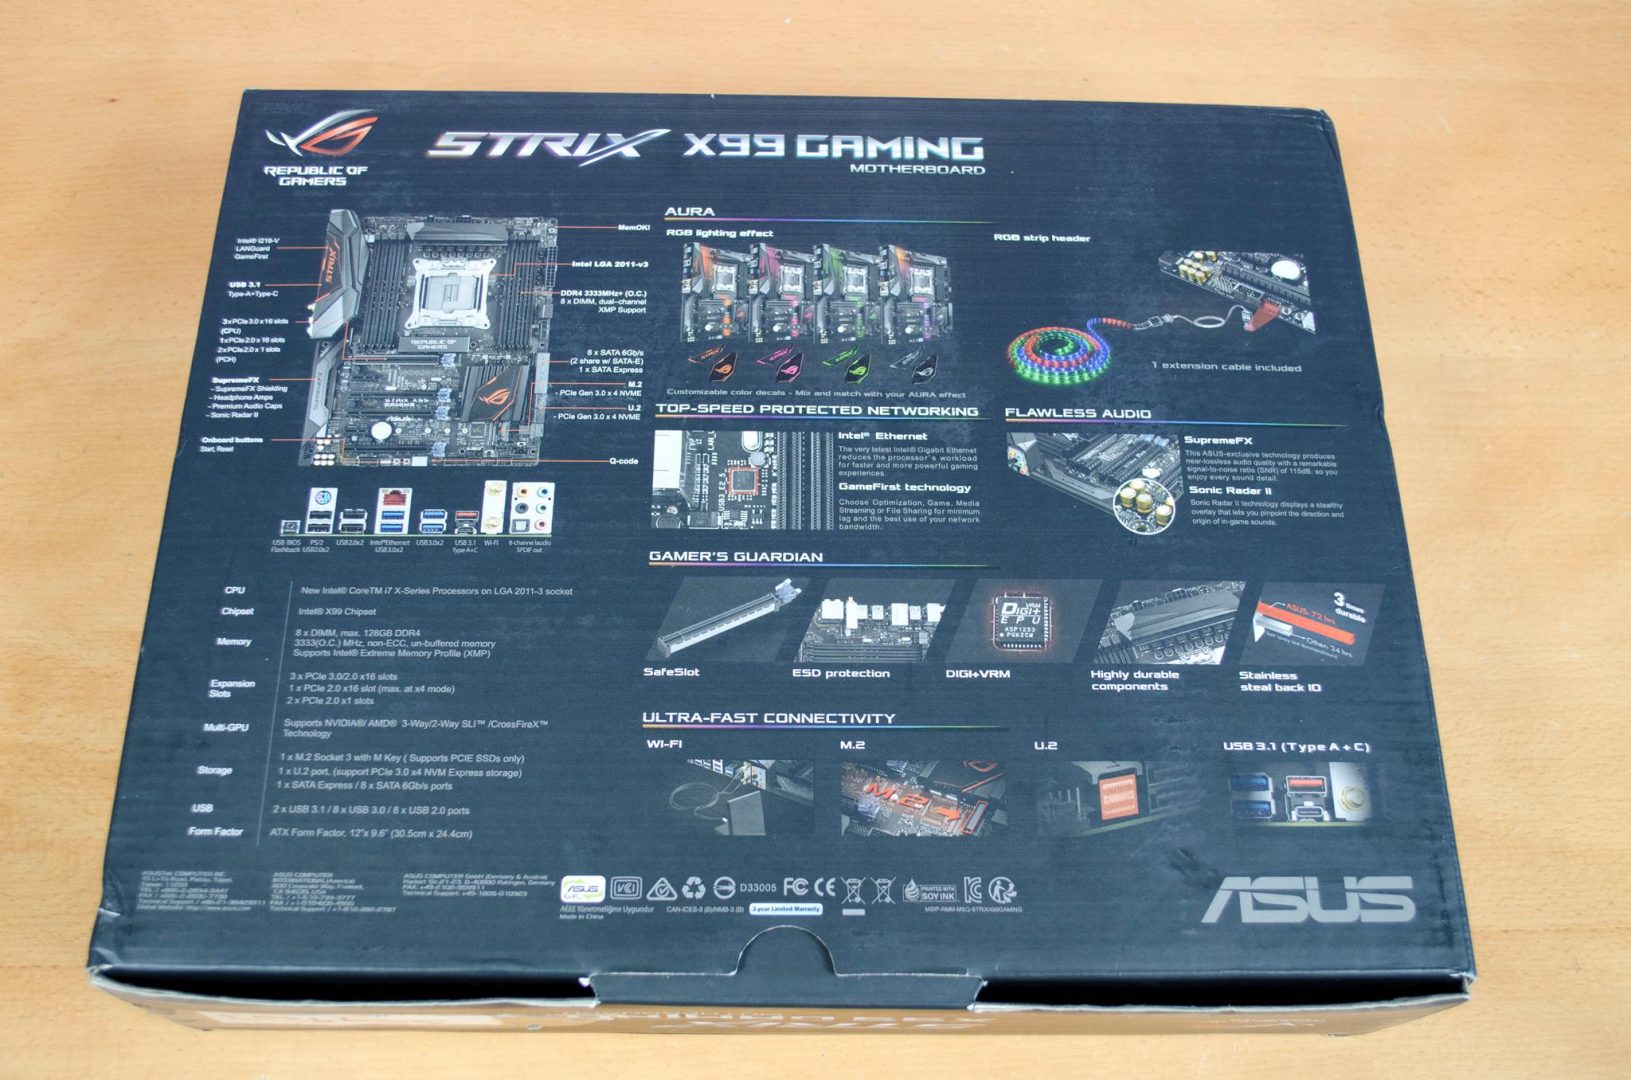
The back of the box is full of information and images on some of the features this board has to offer. As mentioned, there are loads and ASUS has done a great job in trying to highlight some of the more important ones here.
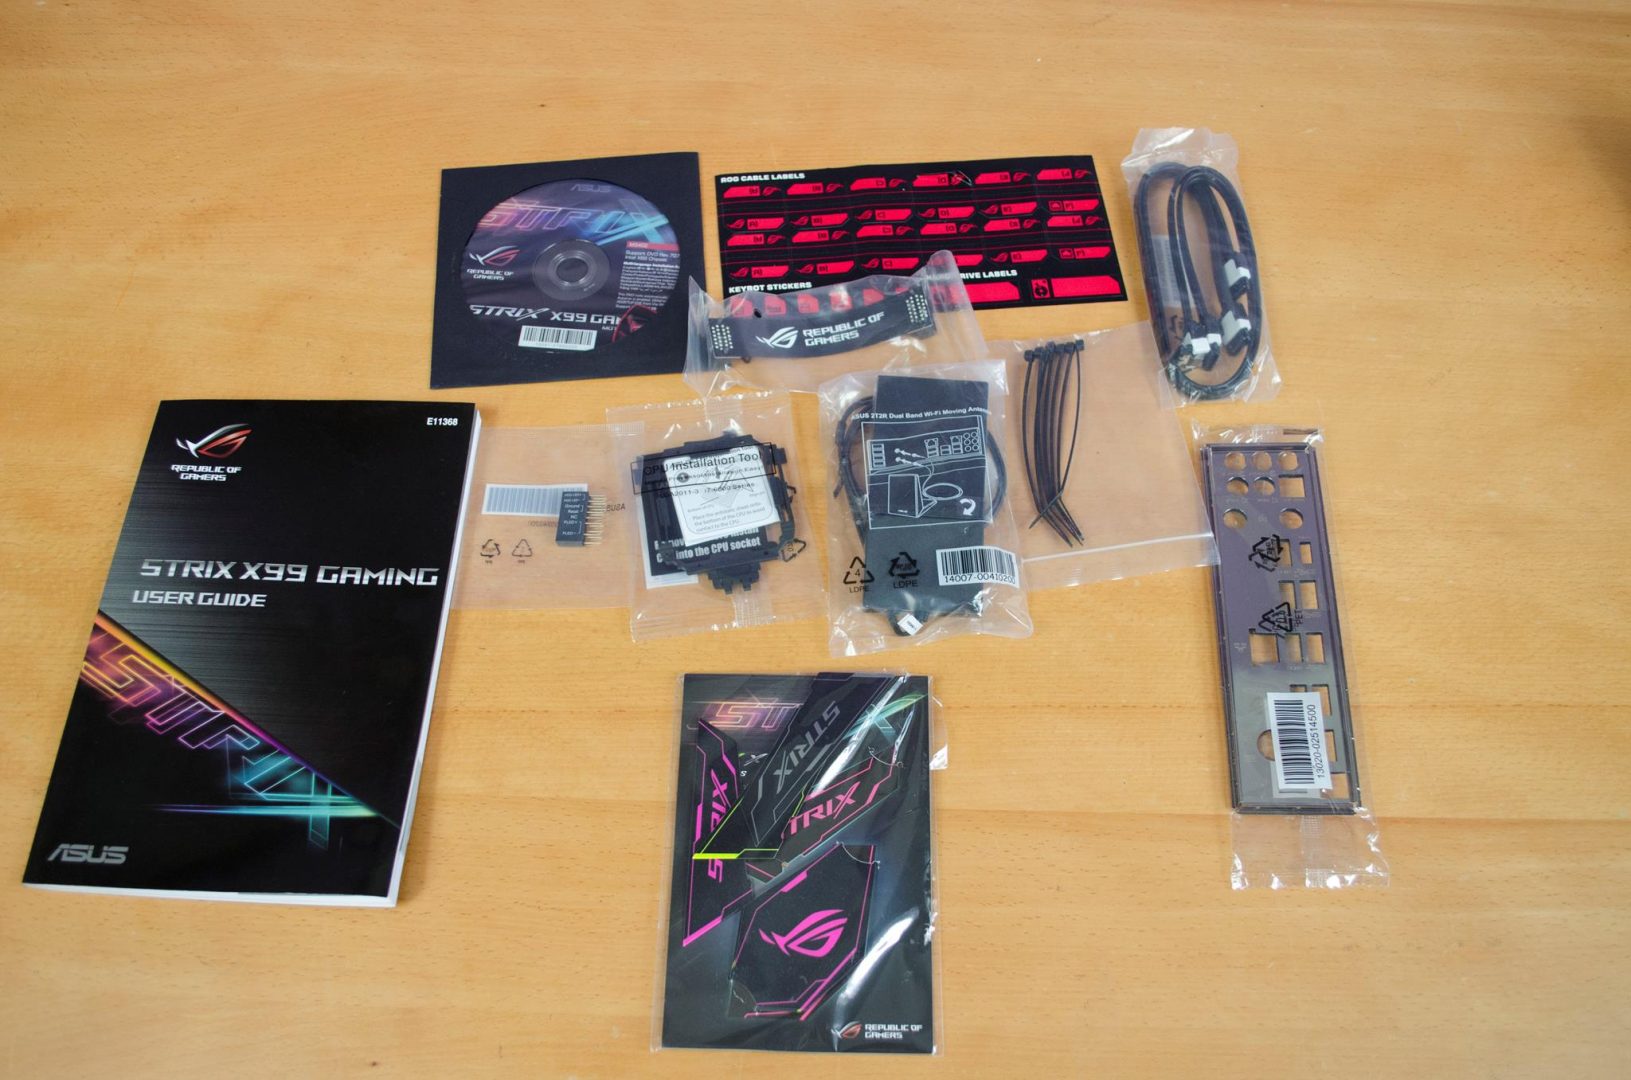
There are a few accessories in the box to help make sure you ascend into the master race properly. Alongside the standard IO shield, SATA cables and SLI bridge we often find inside motherboard boxes, there are also some Zip ties, label stickers, different heatsink covers and a few other bits allowing you to make the most out of the STRIX X99 motherboard.
Closer Look
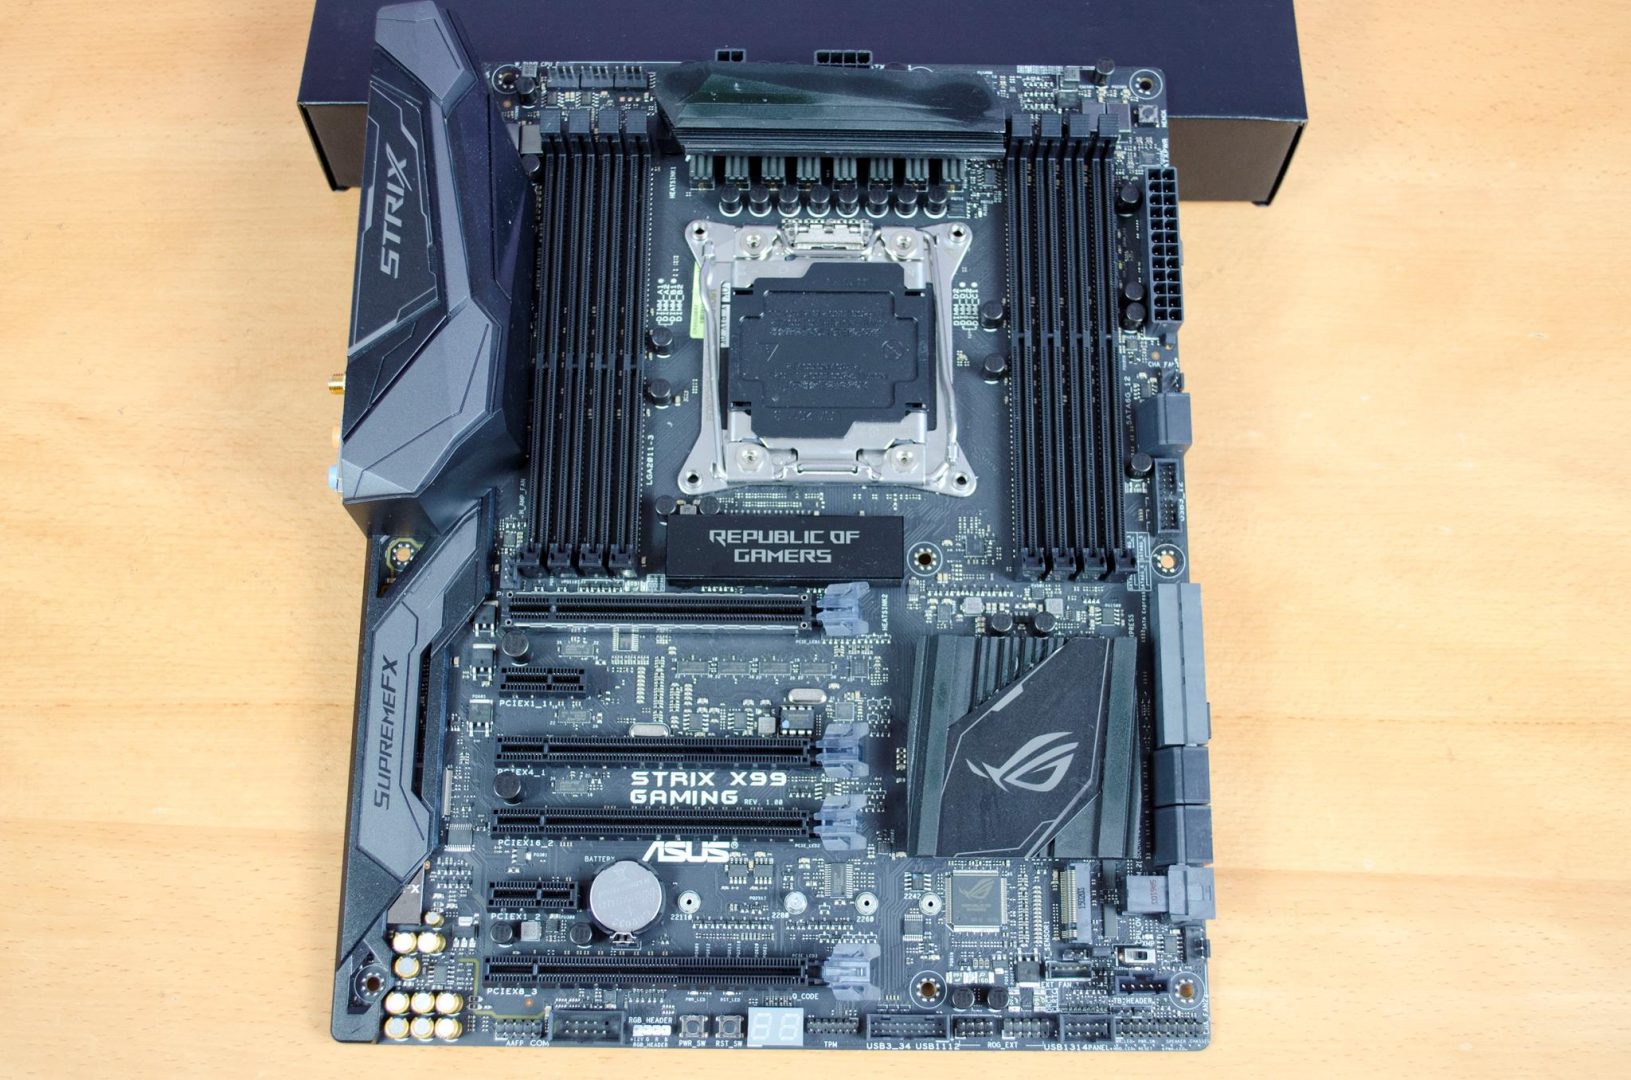
The Strix X99 Gaming features a black aesthetic that when combined with the RGB LEDs VIA AURA Sync, it should be able to be paired up with most any colour scheme you may have. Just having a quick look at the board in its entirety, we can see it has a log going on. There are plenty of fan connectors laid out around the board. We can also see there is an extra 4-pin power connect on the top of the board next to the 8-EPS connector and much much more. As we saw with the accessories, the ‘STRIX’ and ‘ROG Eye’ logos are plastic pieces that can be swapped out with coloured ones if you feel they would better match your build.
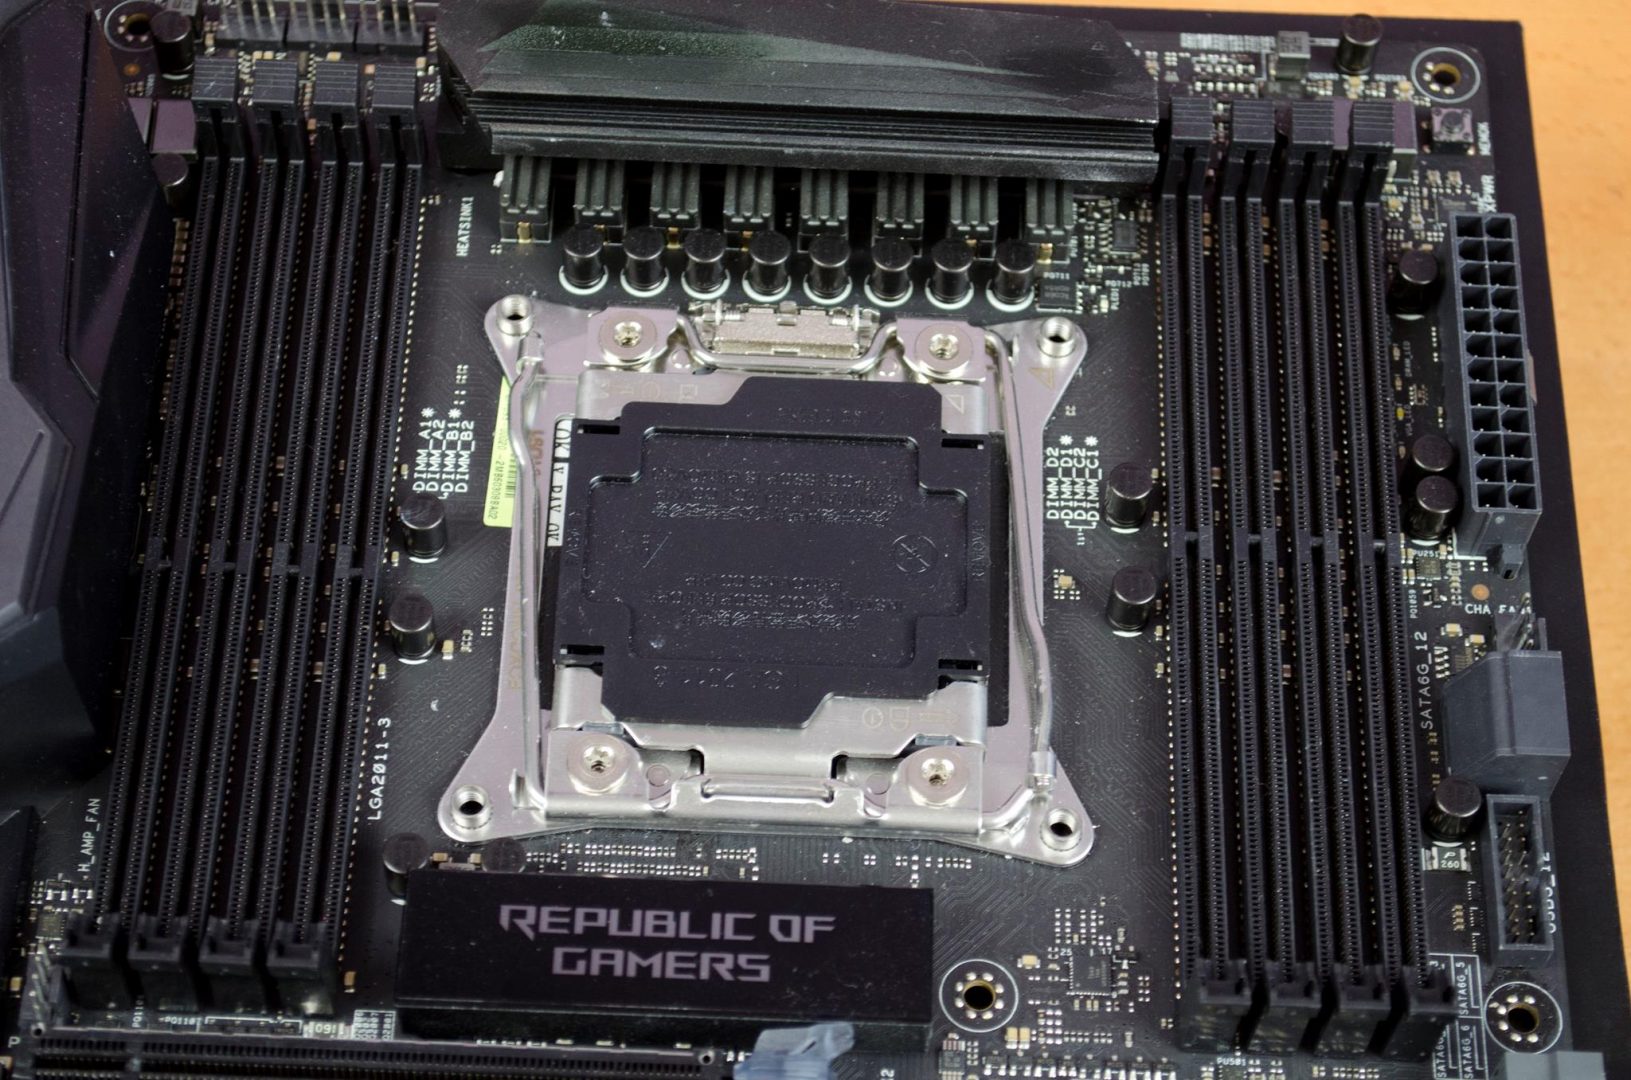
Right above the CPU socket, we have the Digital 8-phase CPU Power VRM Section controlled with an ASP1257 controller. On either side of the CPU, closer to the RAM DIMMS we have two separate DRAM Power section using a pair of 97374 Ti MOSFETs and PWM controller is DIGI + VRM ASP1250 chip. Combining these with the extra 4-Pin power connector, this board is set for some pretty impressive overclocking which we will take a look at in a bit, don’t worry. Below the CPU socket, we see the ‘Republic of Gamers’ text which is one of the RGB zones found on this board. The RGB zones can be controlled with the AURA Desktop APP and have plenty of customisation options.
There is a total of 8 x DIMM slots that can handle DDR4 Memory with a Max. capacity of 128GB and can utilise speeds of up to 3333(O.C.)/3300(O.C.)/3000(O.C.)/2800(O.C.)/2666(O.C.)/2400(O.C.)/2133 MHz Non-ECC, Un-buffered Memory. If you look closely between the RAM DIMM slots and the CPU socket you can see the DIMM slots are labelled so if you are only using 4x DIMMs, you will know which slots to put them in.
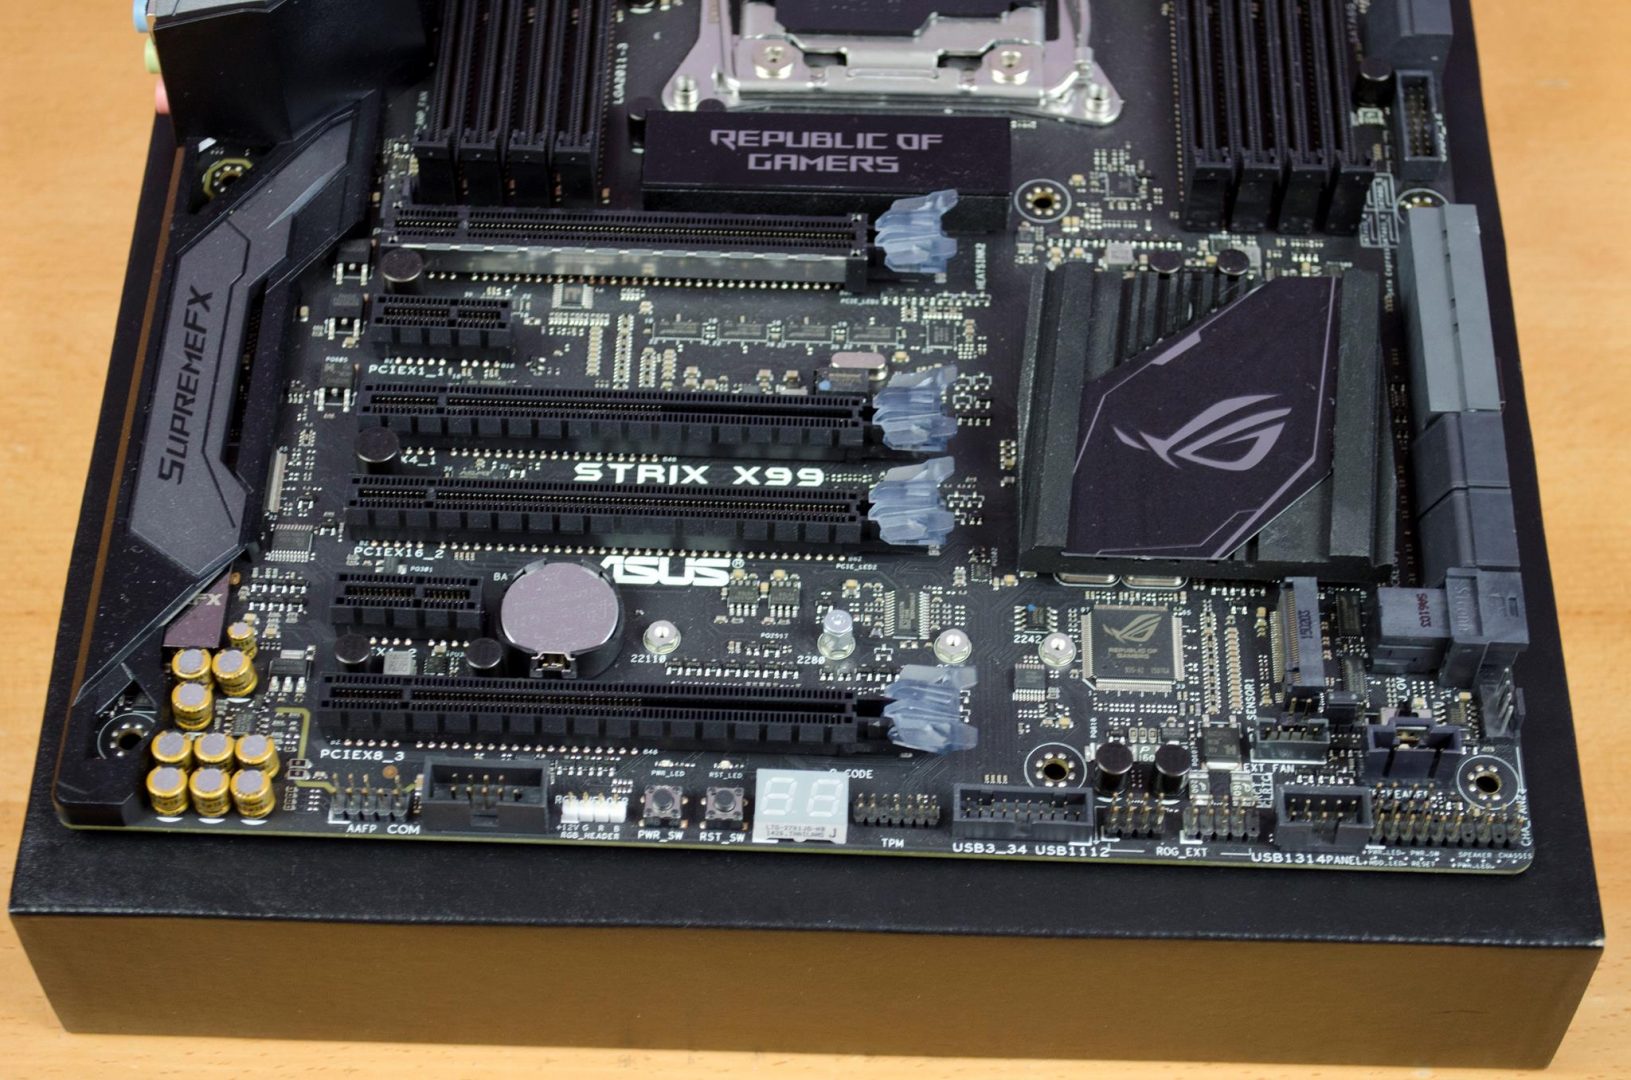
For expansion slots there are 3 x PCIe 3.0/2.0 x16 ( x16, x16/x16, x8/x16/x8 mode with 40-LANE CPU; x16, x16/x8, x8/x8/x8 mode with 28-LANE CPU)
1 x PCIe 2.0 x16 (x4 mode)
2 x PCIe 2.0 x1
The top PCIe is also reinforced to provide extra protection for the slot as the top-end GPUS these days are getting quite heavy, especially if they have a triple fan cooling solution and a backplate! You’ll notice the clips on the full-length PCIe slots look a bit odd, this is because they too feature RGB LEDs. While everyone may not be a fan of RGB LEDs, they can, of course, be set to single colours to match your current colour scheme or even turned completely off.
Below the Southbridge heatsink is where the M.2 connector is located and to the right of that is the U.2 connector. This is going to allow users to utilise PCIe SSDs of various types that will offer some blistering fast speeds.
Looking at the bottom of the board and there are USB 2.0/3.0 headers, Audio headers, 4-pin RGB header, Power/Reset buttons alongside Debug LEDs, ROG Extension headers and the front panel headers for your case’s power/reset buttons and LEDs.
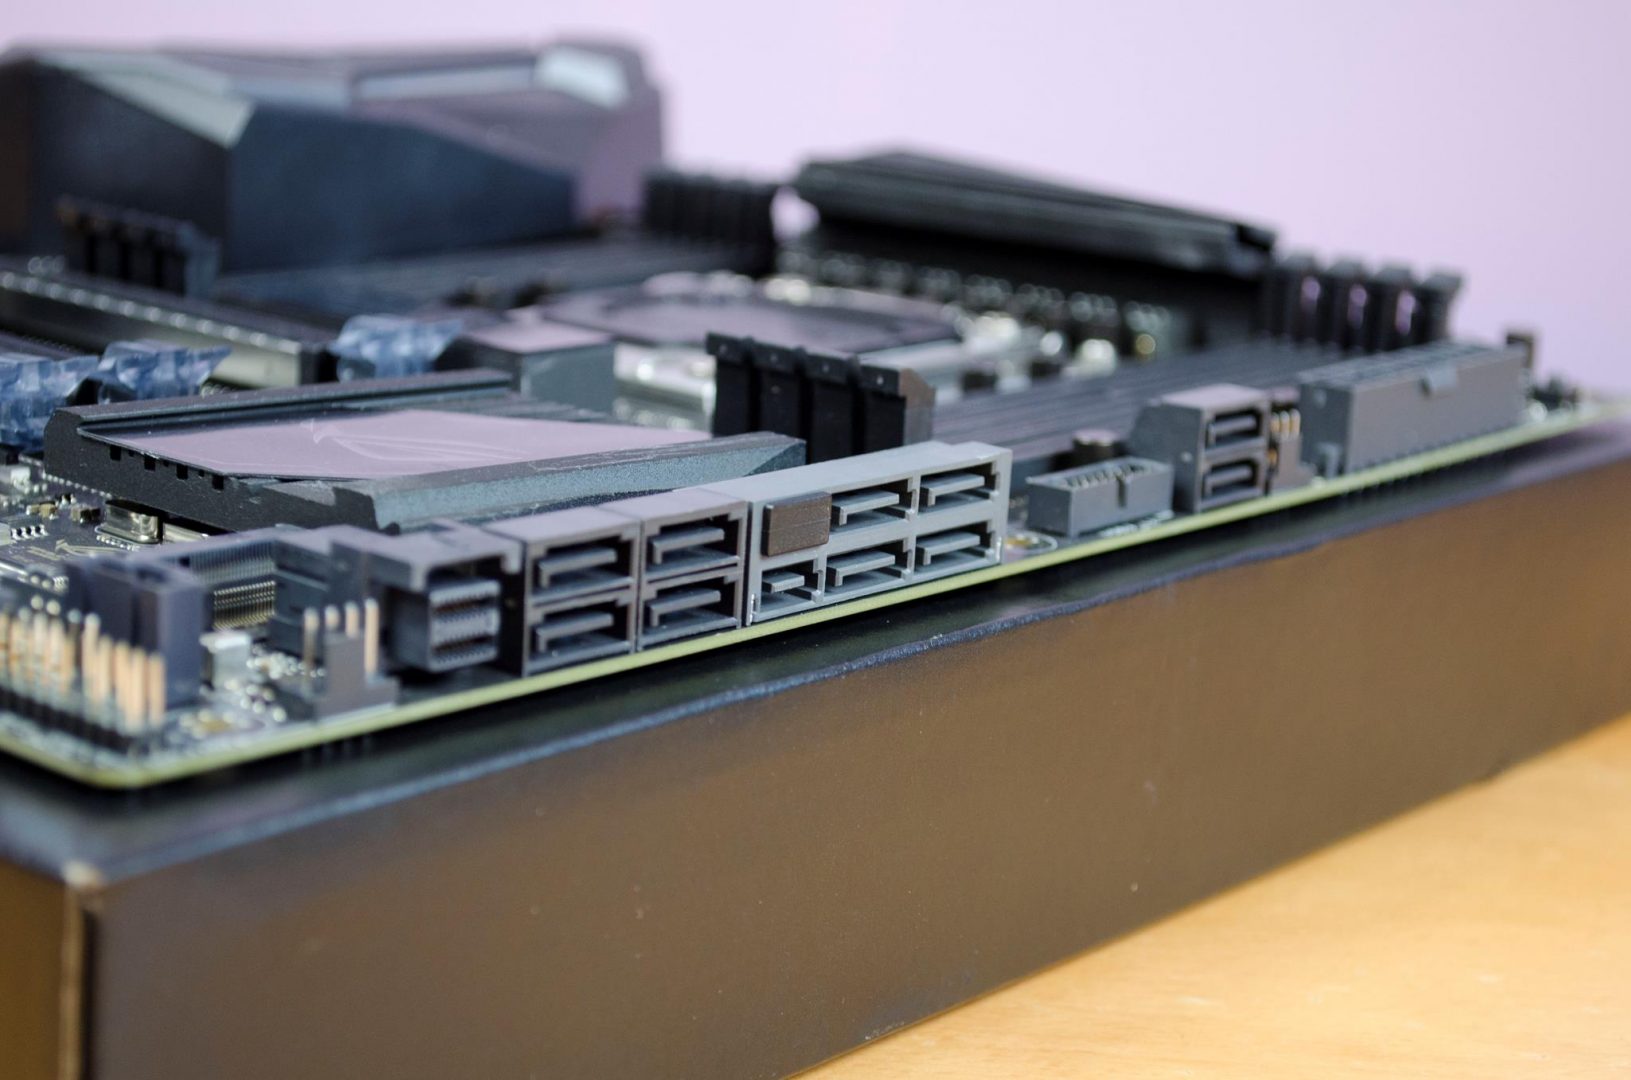
Looking at the right side of the board and we can start off with a 4-pin PWM fan header. Next, we have the U.2, a number of SATA and SATA Express ports, USB3.0 header, a couple more SATA connectors, 4-pin PWM fan connector and the 24-pin power connector. The SATA ports include:
1 x SATA Express port, Compatible with 2 x SATA 6.0 Gb/s ports
8 x SATA 6Gb/s port(s),
Supports Intel® Smart Response Technology, Intel® Rapid Recovery Technology
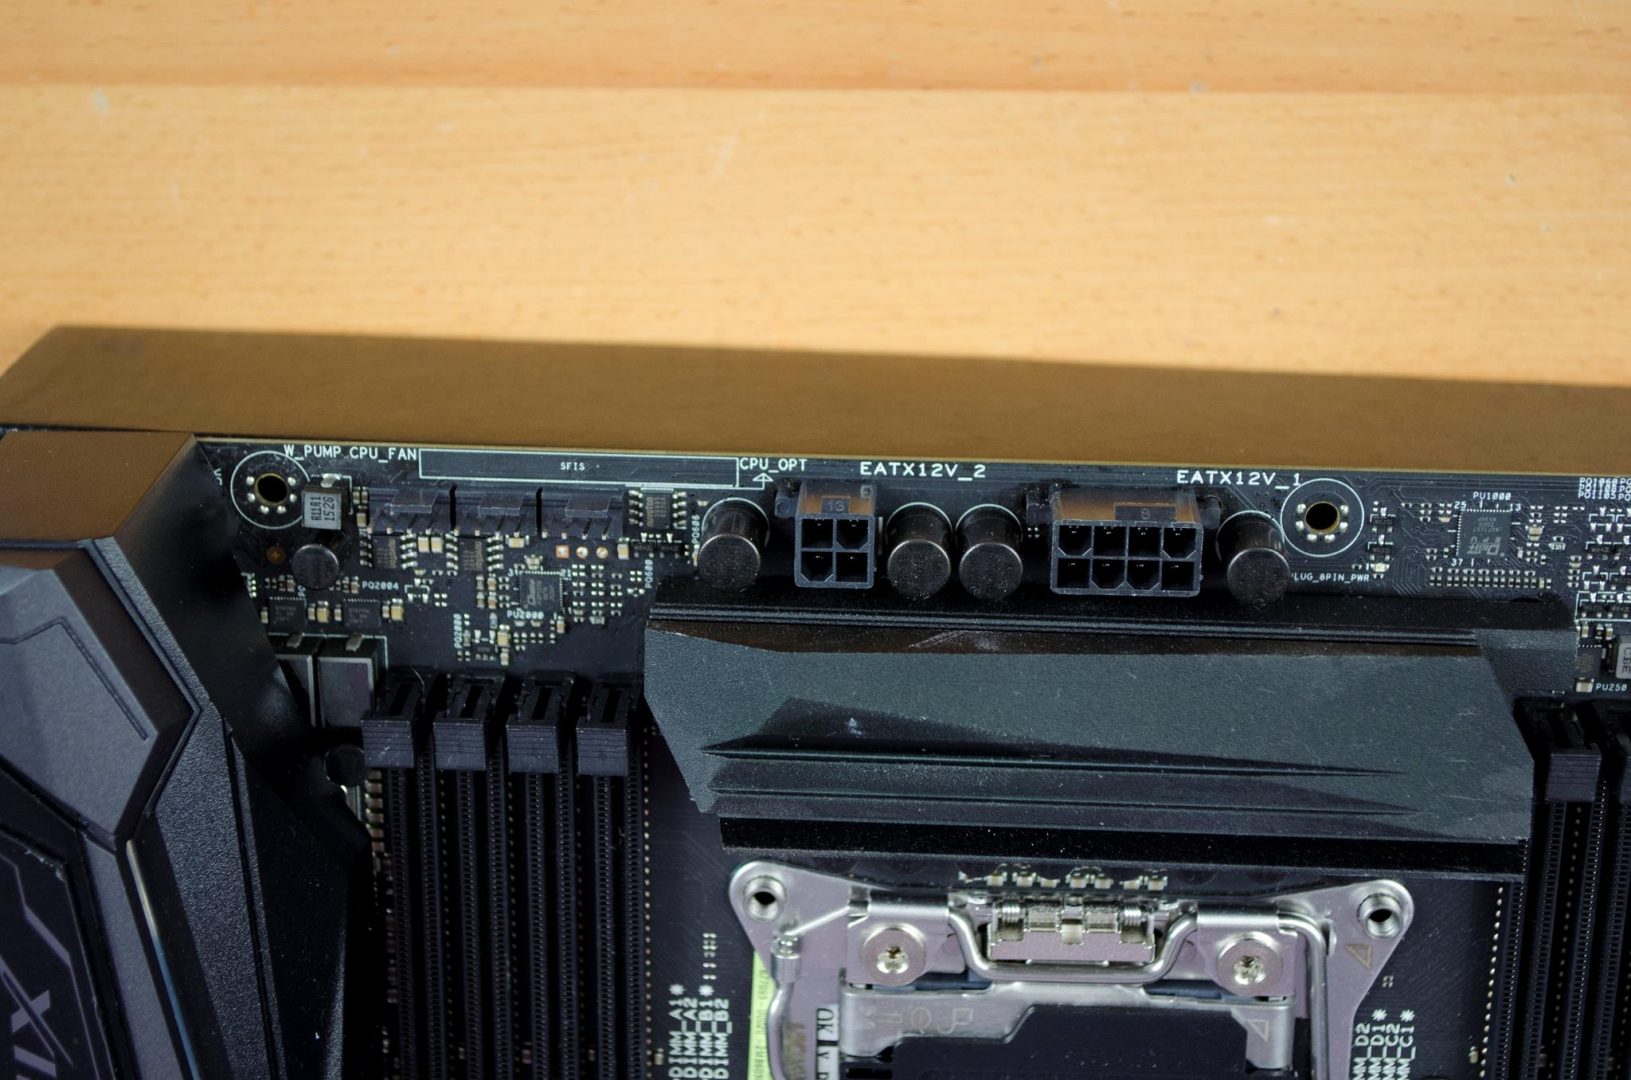
Working our way across the board in no real particular order, we can now take a quick look at the top. As mentioned, there are 8 and 4 pin power connectors here. The 8-pin is going to be your standard one that will power up the main features of the motherboard and can be used on its own. The 4-pin is going to help those who need it get a little more juice to the board so they can push their overclocks even further.
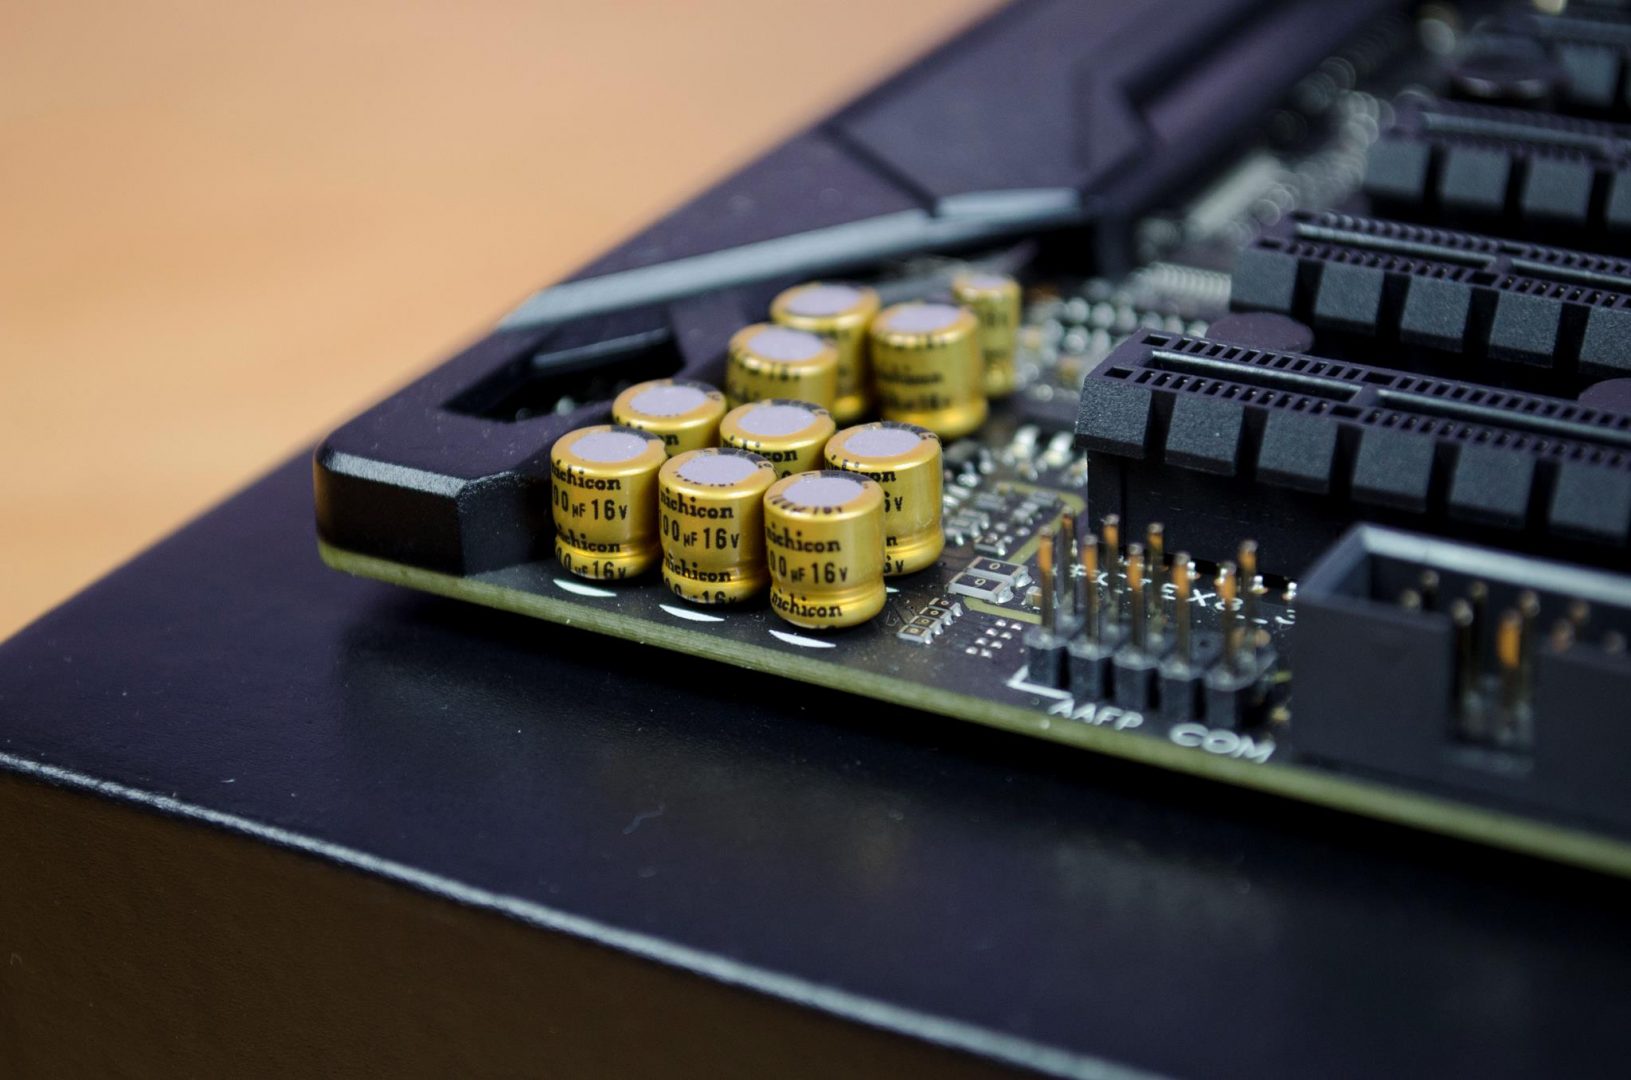
Nichicon capacitors anyone? There is a nice little bunch of them down in the bottom left-hand corner! ASUS has done a great job at making sure this board is designed only using quality components and is going to over some impressive performance.
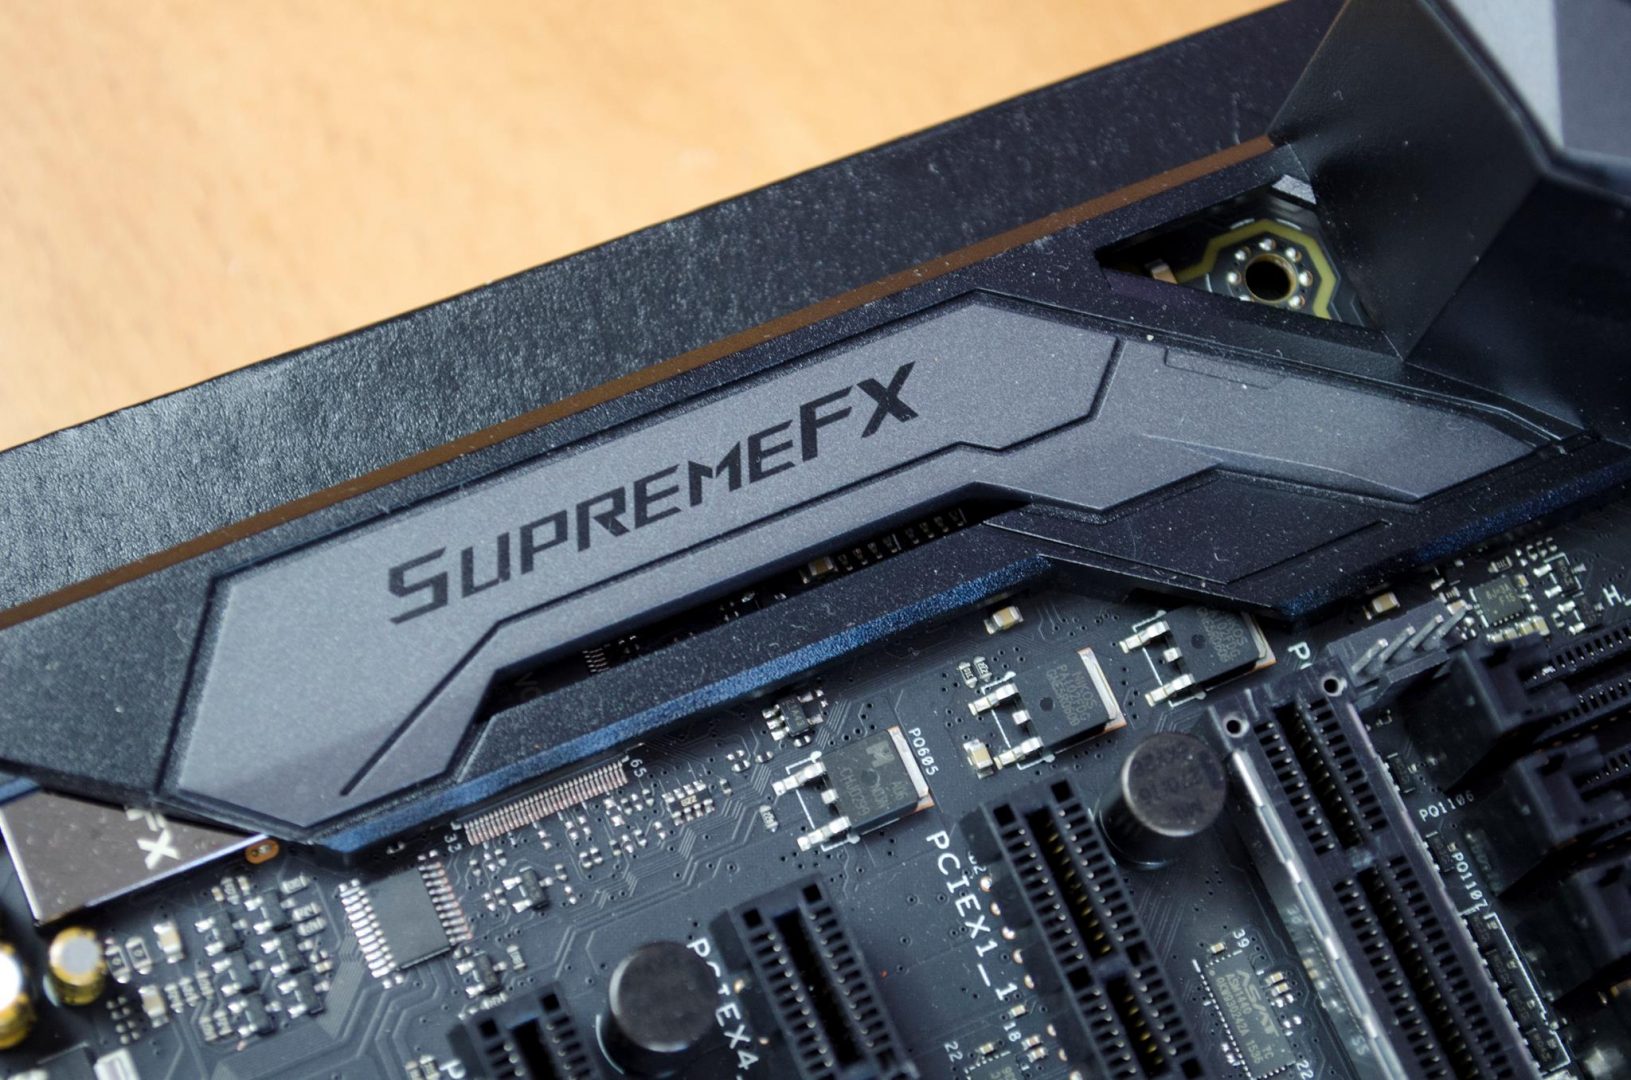
Following on from the Nichicon capacitors we can now take a look at The SupremeFX feature. The SupremeFX is going to offer crisp and clear audio and has some pretty cool features packed in for us gamers. It has an EMI shield to help combat electromagnetic interference and dual OP amplifiers that offer 32-300Ω- so you can make sure you are getting the most from your favourite pair of headphones.
Those looking to take their gaming to the next level can utilise the SONIC RADAR II program which can even help you better pinpoint your enemies exact location so you can get the jump on them!
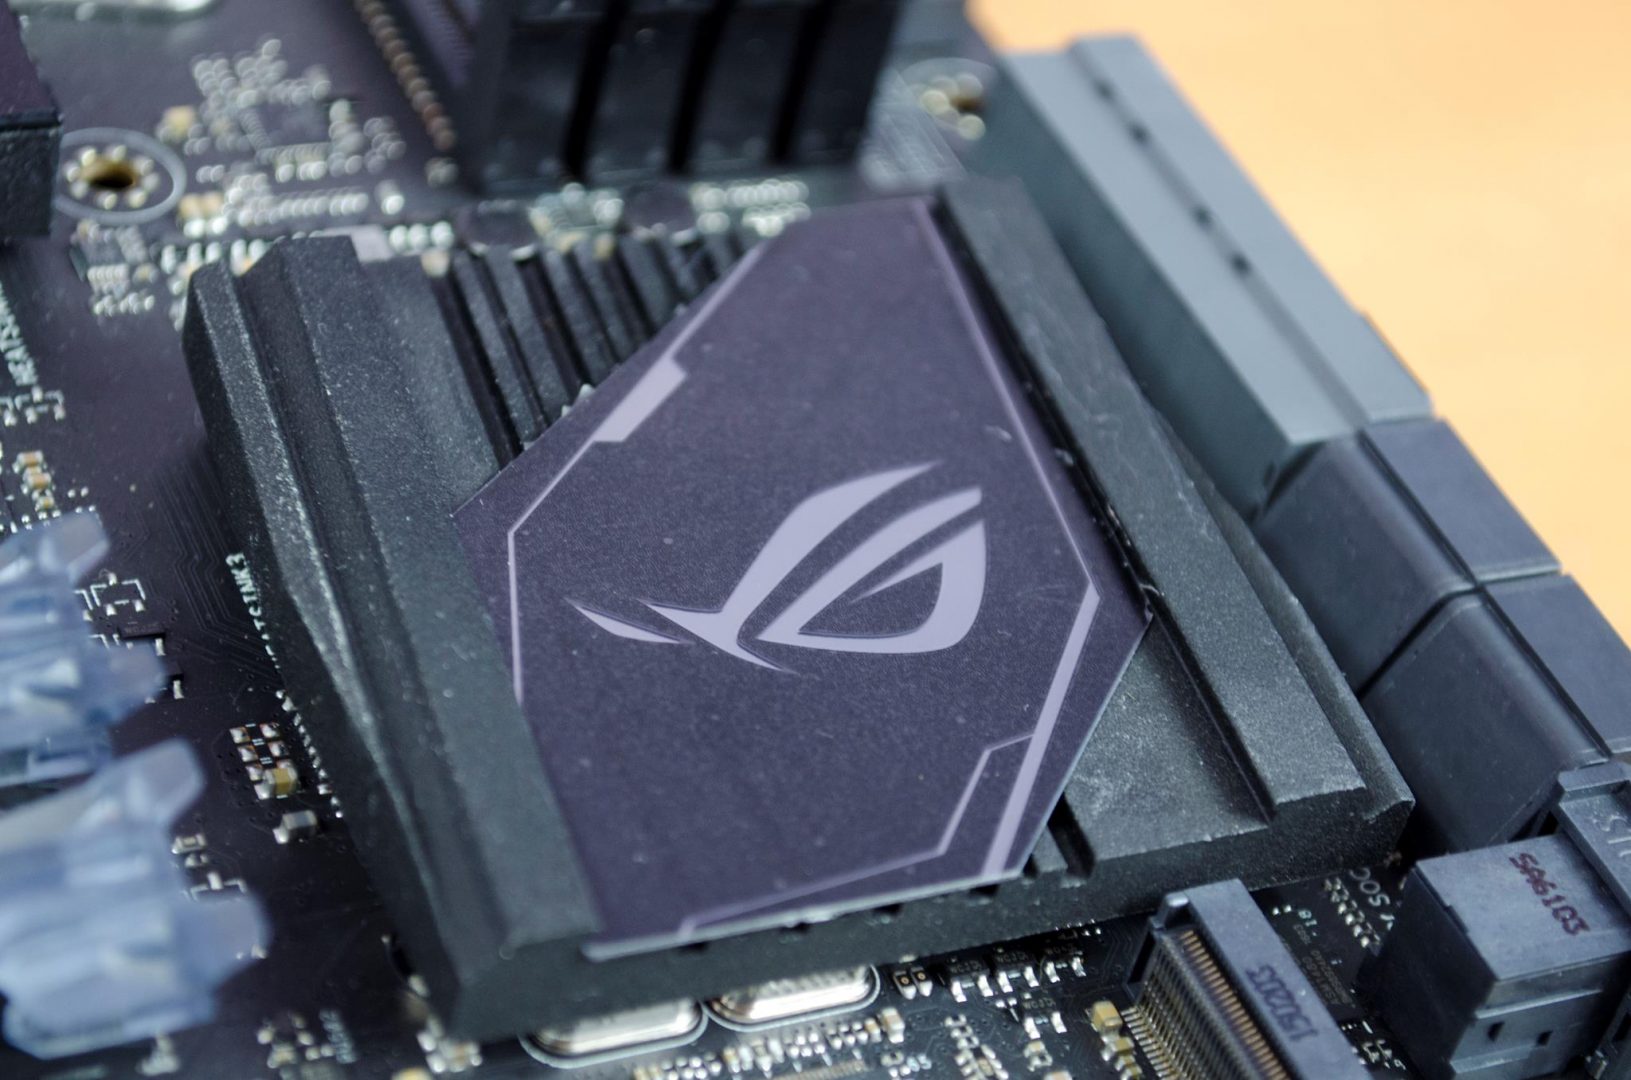
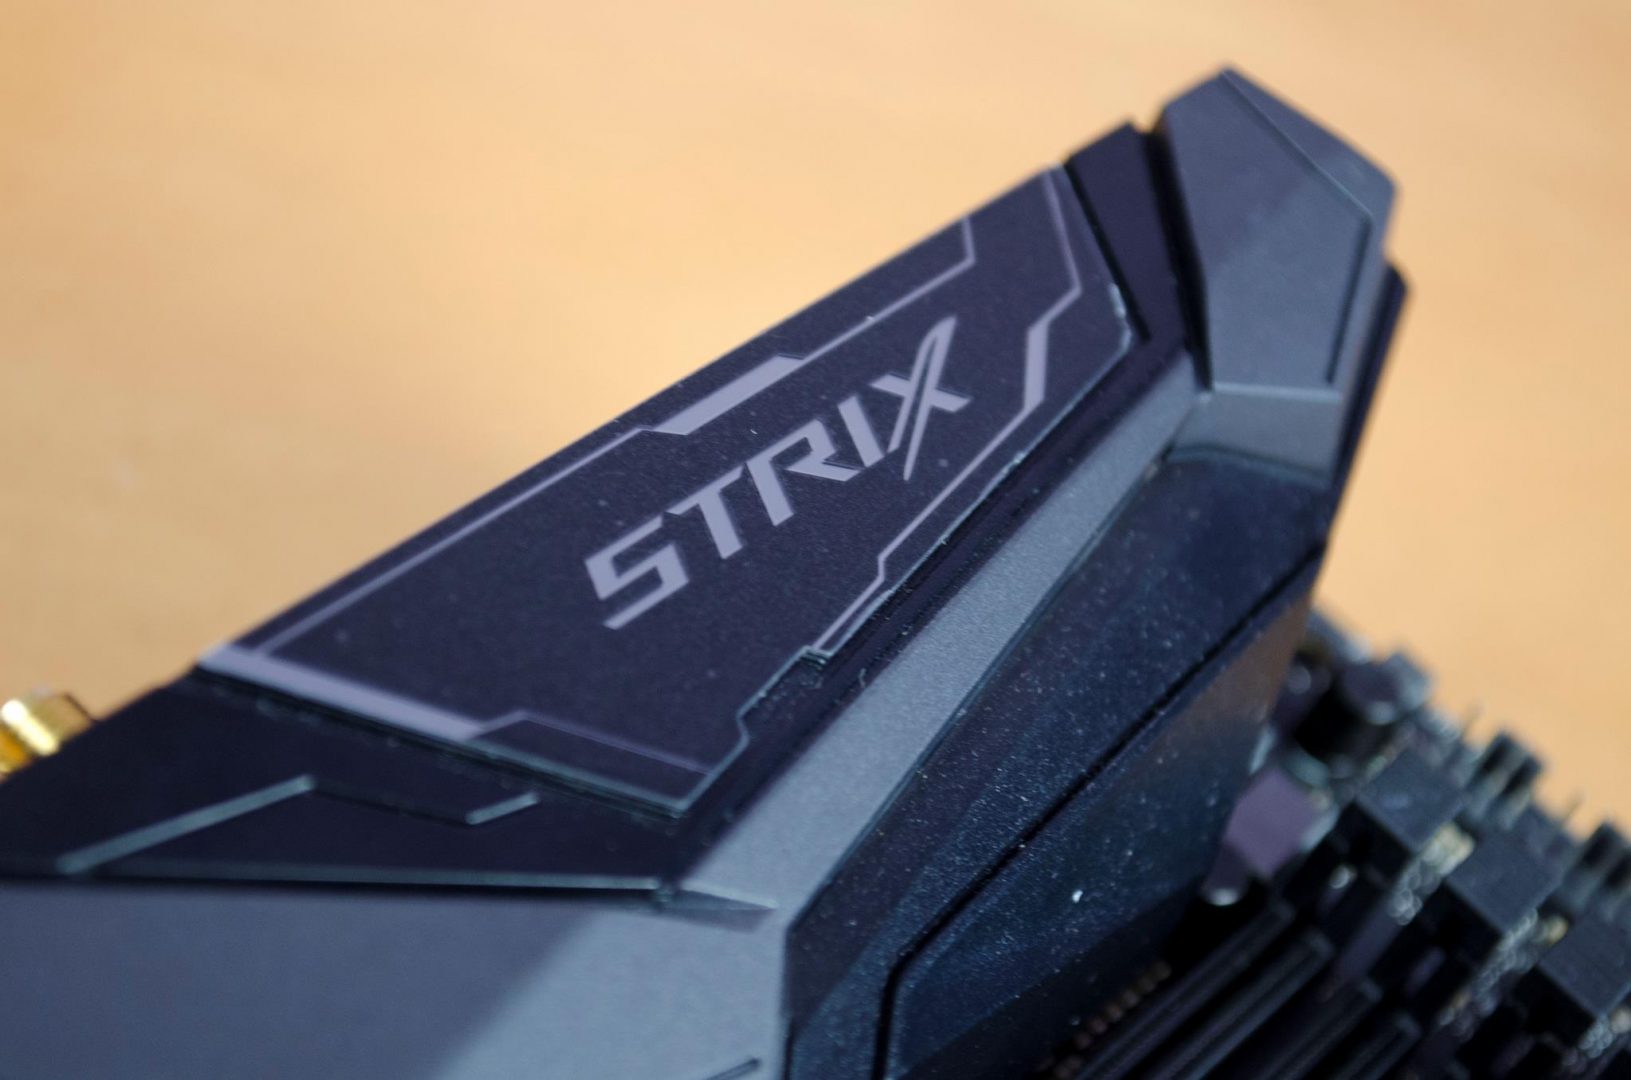
To keep with the overall black/grey theme of the board I went ahead and used the plain decals. We saw that there were a few different colours included inside the box with the accessories and will help users get that much more customisation out of their Strix X99 gaming motherboard. Both the ‘Rog Eye’ and ‘Strix’ decals can be easily changed.

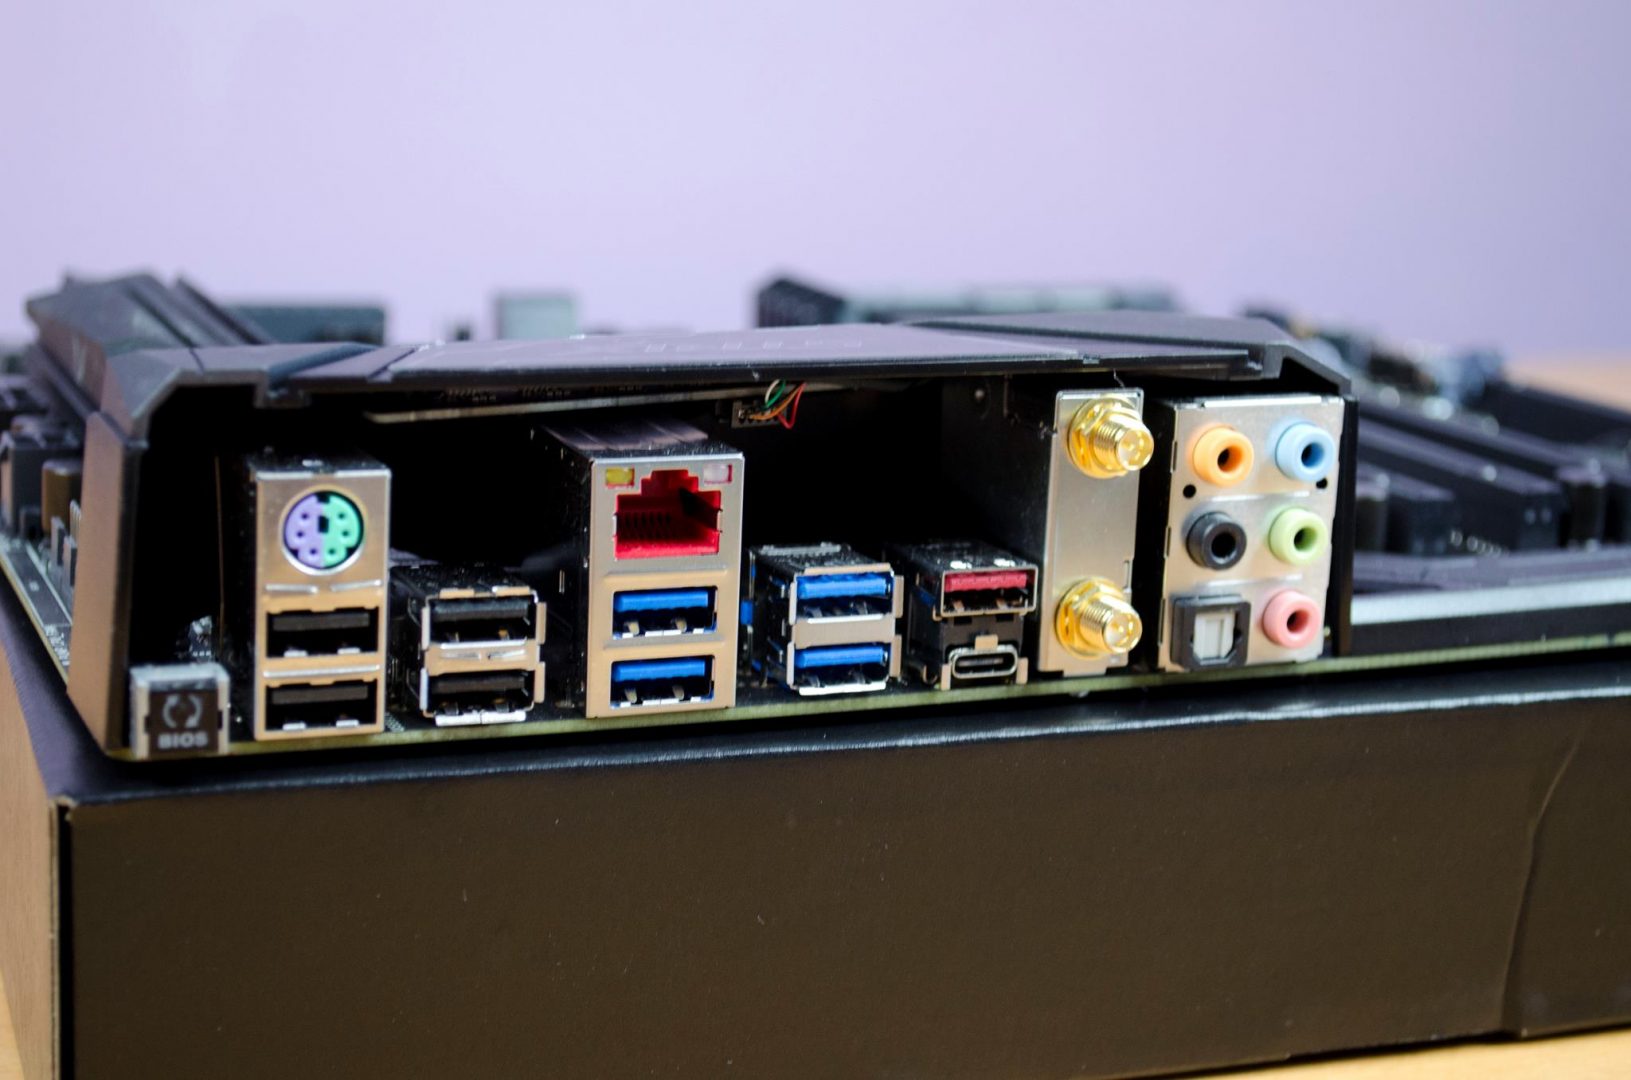
The BAck panel has quite a bit going on and consists of:
1 x PS/2 keyboard/mouse combo port(s)
1 x LAN (RJ45) port(s)
1 x USB 3.1 Gen 2 (red)Type-A
1 x USB 3.1 Gen 2 (black)USB Type-CTM
4 x USB 3.1 Gen 1 (blue)
4 x USB 2.0 (one port can be switched to USB BIOS Flashback)
5 x Audio jack(s)
1 x USB BIOS Flashback Button(s)
1 x ASUS Wi-Fi GO! module (Wi-Fi 802.11 a/b/g/n/ac and Bluetooth v4.0
ASUS AURA SYNC RGB LED Preview
Test System
Performance and Benchmarks
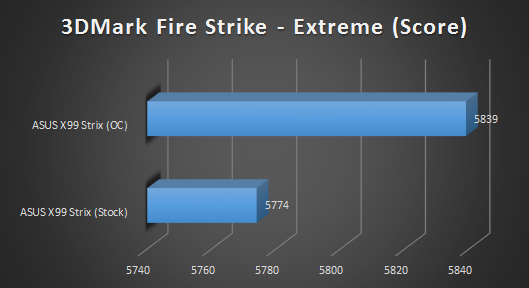
3D Mark Fire Strike
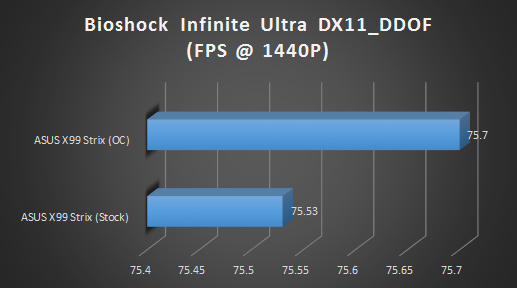
Bioshock Infinite
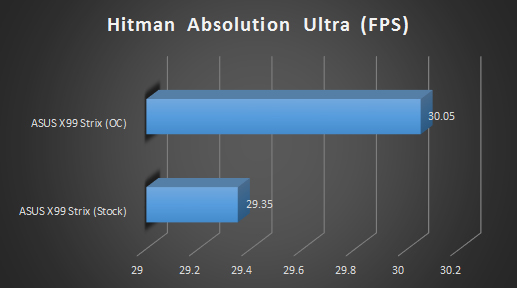
Hitman Absolution
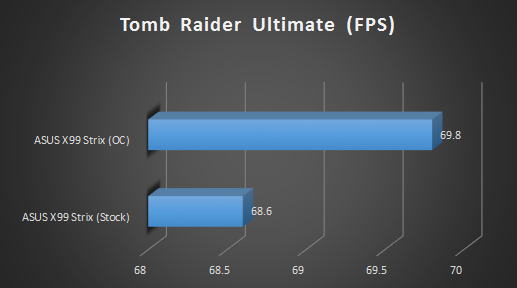
Tomb Raider
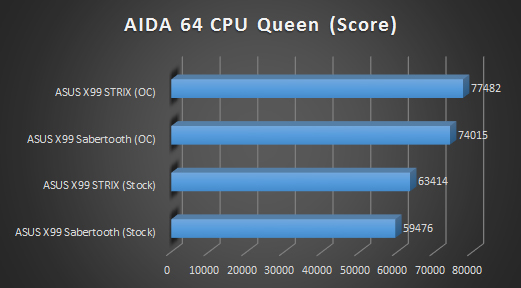
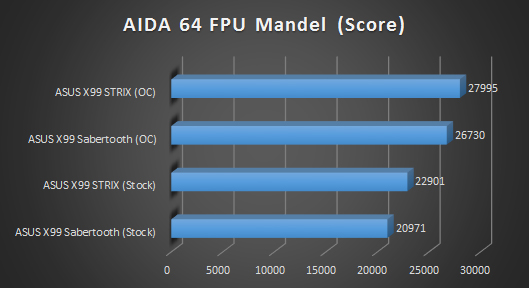
AIDA 64
Cinebench 11.5
SiSoftware Sandra
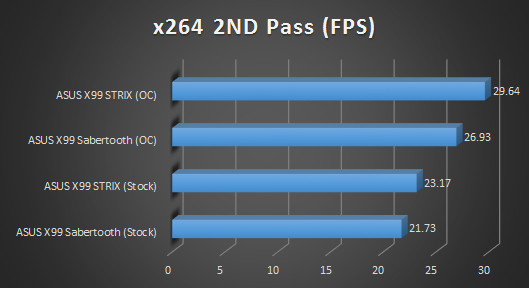
x264
Overclocking
Overclocking
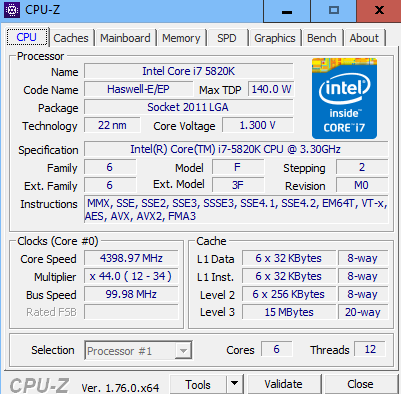
ASUS have gone to great extents to make sure this board is amazing, no matter the task at hand. When it came time to Overclock the CPU, I, of course, went into the BIOS and had a little look around. Knowing my Chip, I immediately went for 4.2GHz at 1.3v as I have seen this result on a couple of other motherboards and surely enough, the X99 Strix handled it with ease. I then start using the multiplier by 1 giving a .1GHz jump in CPU speed every time. When I got to 4.6GHz, the PC stayed on the black screen letting me know the overclock wasn’t stable. Backing it down to 4.5GHz and I could manage to boot into windows but again, it wasn’t stable and would either crash randomly or I would get the blue screen errors.
4.4GHz was the final result and this is great! This is the highest overclock I have had on my CPU and it has been fine ever since. Not only have I stress tested it, but I’ve played all my games and even rendered a couple of videos on this overclock and ll seems well.
Final Thoughts
I’ve been enjoying this board for some time now in my main rig. I currently have it paired up with a STRIX RX 480 and it is quite the beastly little rig! It is capable of running most things on at least high in 1440P and the RGB lighting and AURA sync help it look amazing. Yes, I am a sucker for LEDs and while I normally have them set to a single colour, I do like to have them all matching.
Performance
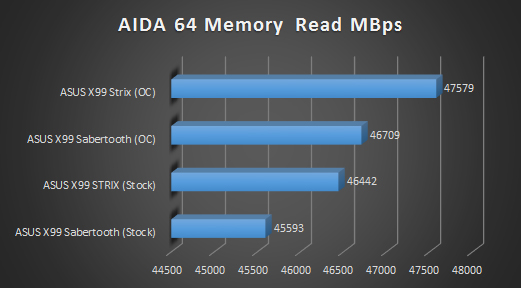
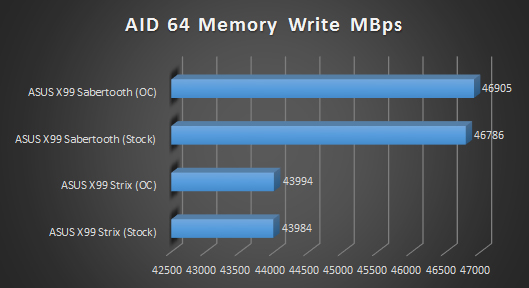
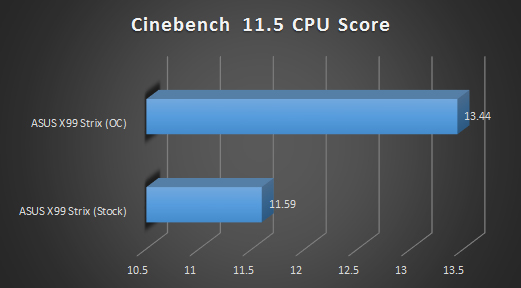
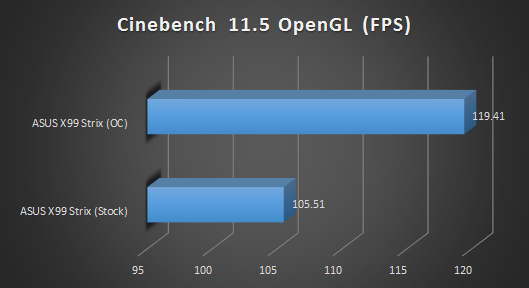
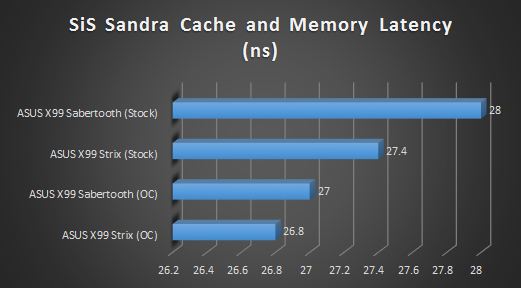
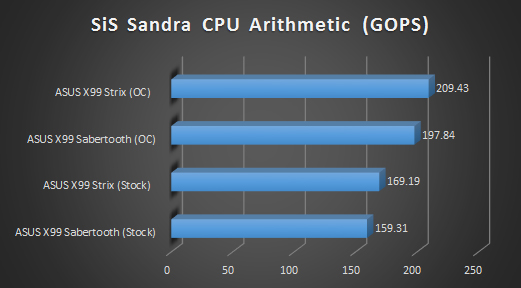
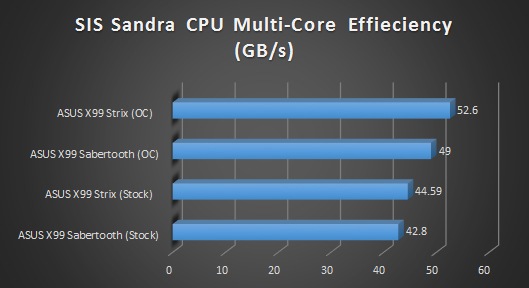
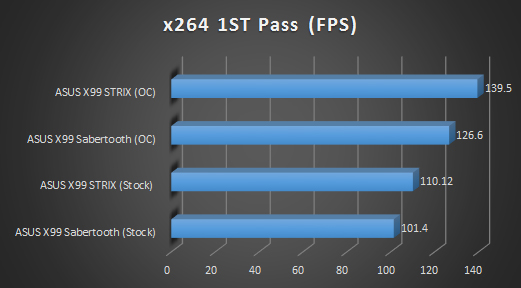
I was quite pleased with the performance the X99 Strix has to offer, even running everything on stock settings and this board helps to offer maximum performance. The numbers don’t lie and when it came to overclock my 5820K, I was quite surprised at the final result. The X99 Strix offered an extra 100MHz over what I had previously seen from ASUS’ own Sabertooth X99 motherboard. I have also used this board to achieve some fairly good RAM overclocks as well in the past which when added in with the CPU overclock should give users a nice gain in overall performance across almost anything they may do. There is also a whole host of programs that ASUS have released that can accompany this motherboard that will allow you to get even more performance from everything! Looking back at the benchmark results and we can even see the extra performance gained in the synthetic tests from overclocking the CPU. All in all, very happy with the performance on offer from the X99 Strix Gaming!
Design
This has to be one of the best looking X99 I have personally have the experience of getting my hands on. From a purely aesthetic standpoint, it is just beautiful and the extra customization options just put it over the top. The changeable decals are a nice touch and will go nicely with the RGB LEDs. As we saw in the video in the closer look section, the LEDs can be synced across multiple devices such as GPUs and even your Peripherals to offer an amazing effect and a level of customisation that is just unheard of. Considering the design from a technical standpoint and ASUS have gone all out with their X99 Strix motherboard. The amount of features, ports and slots on this board is amazing. Most users will not make use of everything this board has to offer and that is OK as ASUS have surely designed it for such cases. There’s nothing worse than getting a motherboard and finding out it doesn’t have a feature you need, but having too many features can’t really be too bad, though they do impact the price a bit. However, it is also worth remembering the X99 platform is enthusiast level and not really aimed at budget-friendly lower-end hardware in general.
Value
Coming in at around £280 at the time of review, the ASUS Strix X99 Gaming motherboard is jam packed with useful features and customisation options. For your money, you are getting a board that not only looks amazing, it performs equally amazing as well. Also worth noting that there are other X99 boards that are even more pricey which makes saying that the X99 Strix is good value for the money even easier. All in all, it does what it sets out to do and looks good doing it and the features it has are more than worth the asking price of the motherboard.
Many thanks to ASUS for supplying us with their ROG Strix X99 Motherboard!


